Overview
In this tutorial, we delve into the intricacies of crafting an accessible Progressive Web App (PWA) on the Flow blockchain, tackling the challenge of mobile mainstream accessibility in web3. Recognizing the complexity of current onboarding processes, we will guide you through a streamlined approach, featuring a seamless walletless mobile login to alleviate the often daunting task for new users.
Understanding Progressive Web Apps (PWAs)
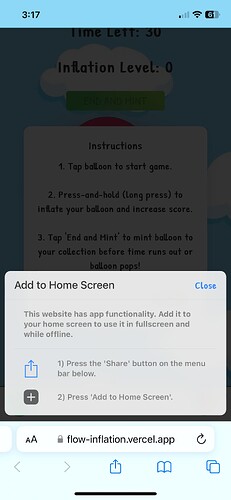
Progressive Web Apps (PWAs) have garnered attention recently, with platforms like friend.tech leading the way in popularity. PWAs blur the lines between web pages and mobile applications, offering an immersive, app-like experience directly from your browser. You can easily add a shortcut to your home screen, and the PWA operates just like a native application would. Beyond these capabilities, PWAs also boast offline functionality and support for push notifications, among many other features.
Exploring Walletless Onboarding
Walletless onboarding is a groundbreaking feature that enables users to securely interact with decentralized applications (dApps) in a matter of seconds, all without the traditional necessity of creating a blockchain wallet. This method effectively simplifies the user experience, abstracting the complexities of blockchain technology to facilitate swift and straightforward app access. For a deeper dive into walletless onboarding and its integration with Flow, feel free to explore the following resource: Flow Magic Integration.
Detailed Steps
To effectively follow this tutorial, the developer requires a few essential libraries and integrations. Additionally, there is a ready-made flow scaffold called FCL PWA that contains the completed tutorial code, providing a solid foundation for you to build your Progressive Web App (PWA)!
Dependencies
- Magic Account: Start by setting up an app on magic.link, during which you will obtain an API key crucial for further steps.
- Magic SDK: Essential for integrating Magic’s functionality in your project, and can be found here.
- Magic Flow SDK: This SDK enables Magic’s integration with Flow. You can install it from this link.
- Flow Client Library (FCL): As the JavaScript SDK for the Flow blockchain, FCL allows developers to create applications that seamlessly interact with the Flow blockchain and its smart contracts.
- React: Our project will be built using the React framework.
Setting up PWA and Testing Locally
Initiate the creation of a new React app, opting for the PWA template with the following command:
_10npx create-react-app name-of-our-PWA-app --template cra-template-pwa
Ensure that serviceWorkerRegistration.register() in index.js is appropriately configured to support offline capabilities of your PWA.
Proceed to build your application using your preferred build tool. In this example, we will use Yarn:
_10yarn run build
Following the build, you can serve your application locally using:
_10npx serve -s build
To thoroughly test your PWA, especially on a mobile device, it’s highly recommended to use a tool like ngrok. Start ngrok and point it to the local port your application is running on:
_10ngrok http 3000
Grab the generated link, and you can now access and test your PWA directly on your mobile device!
You can now grab the link and go to it on your mobile device to test the PWA!
Integrating with Magic
Proceed to install the Magic-related dependencies in your project. Ensure you add your Magic app’s key as an environment variable for secure access:
_10yarn add magic-sdk @magic-ext/flow @onflow/fcl
Let’s create a helper file, magic.js, to manage our Magic extension setup. Ensure that your environment variable with the Magic API key is correctly set before proceeding.
_13import { Magic } from "magic-sdk";_13import { FlowExtension } from "@magic-ext/flow";_13_13const magic = new Magic(process.env.REACT_APP_MAGIC_KEY, {_13 extensions: [_13 new FlowExtension({_13 rpcUrl: "https://rest-testnet.onflow.org",_13 network: "testnet",_13 }),_13 ],_13});_13_13export default magic;
Anytime you need to interface with chain you will use this magic instance.
React Context and Provider for User Data
currentUserContext.js
This file creates a React context that will be used to share the current user's data across your application.
React Context: It is created using React.createContext() which provides a way to pass data through the component tree without having to pass props down manually at every level.
_10import React from "react";_10_10const CurrentUserContext = React.createContext();_10_10export default CurrentUserContext;
currentUserProvider.js
This file defines a React provider component that uses the context created above. This provider component will wrap around your application’s components, allowing them to access the current user's data.
- useState: To create state variables for storing the current user’s data and the loading status.
- useEffect: To fetch the user’s data from Magic when the component mounts.
- magic.user.isLoggedIn: Checks if a user is logged in.
- magic.user.getMetadata: Fetches the user’s metadata.
_37import React, { useState, useEffect } from "react";_37import CurrentUserContext from "./currentUserContext";_37import magic from "./magic"; // You should have this from the previous part of the tutorial_37_37const CurrentUserProvider = ({ children }) => {_37 const [currentUser, setCurrentUser] = useState(null);_37 const [userStatusLoading, setUserStatusLoading] = useState(false);_37_37 useEffect(() => {_37 const fetchUserData = async () => {_37 try {_37 setUserStatusLoading(true);_37 const magicIsLoggedIn = await magic.user.isLoggedIn();_37 if (magicIsLoggedIn) {_37 const metaData = await magic.user.getMetadata();_37 setCurrentUser(metaData);_37 }_37 } catch (error) {_37 console.error("Error fetching user data:", error);_37 } finally {_37 setUserStatusLoading(false);_37 }_37 };_37_37 fetchUserData();_37 }, []);_37_37 return (_37 <CurrentUserContext.Provider_37 value={{ currentUser, setCurrentUser, userStatusLoading }}_37 >_37 {children}_37 </CurrentUserContext.Provider>_37 );_37};_37_37export default CurrentUserProvider;
Logging in the User
This part shows how to log in a user using Magic’s SMS authentication.
- magic.auth.loginWithSMS: A function provided by Magic to authenticate users using their phone number.
- setCurrentUser: Updates the user's data in the context.
_12import magic from "./magic";_12_12const login = async (phoneNumber) => {_12 if(!phoneNumber) {_12 return;_12 }_12 _12 await magic.auth.loginWithSMS({ phoneNumber });_12 _12 const metaData = await magic.user.getMetadata();_12 setCurrentUser(metaData);_12};
Scripts/Transactions with Flow
This example shows how to interact with the Flow blockchain using FCL and Magic for authorization.
- fcl.send: A function provided by FCL to send transactions or scripts to the Flow blockchain.
- AUTHORIZATION_FUNCTION: The authorization function provided by Magic for signing transactions.
_26import * as fcl from "@onflow/fcl";_26import magic from "./magic";_26_26fcl.config({_26 "flow.network": "testnet",_26 "accessNode.api": "https://rest-testnet.onflow.org",_26 "discovery.wallet": `https://fcl-discovery.onflow.org/testnet/authn`,_26})_26_26const AUTHORIZATION_FUNCTION = magic.flow.authorization;_26_26const transactionExample = async (currentUser) => {_26 const response = await fcl.send([_26 fcl.transaction`_26 // Your Cadence code here_26 `,_26 fcl.args([_26 fcl.arg(currentUser.publicAddress, fcl.types.Address),_26 ]),_26 fcl.proposer(AUTHORIZATION_FUNCTION),_26 fcl.authorizations([AUTHORIZATION_FUNCTION]),_26 fcl.payer(AUTHORIZATION_FUNCTION),_26 fcl.limit(9999),_26 ]);_26 const transactionData = await fcl.tx(response).onceSealed();_26};
Account Linking with Flow
Now we can unlock the real power of Flow. Lets say you have another Flow account and you want to link the “magic” account as a child account so that you can take full custody of whatever is in the magic account you can do this via Hybird Custody.
You can view the hybrid custody repo and contracts here: https://github.com/onflow/hybrid-custody
We will maintain two accounts within the app. The child(magic) account form earlier and new non custodial FCL flow account. I won’t go over how to log in with FCL here and use it but you can do the normal process to obtain the parent account.
One you have the parent account and child(magic) account logged in you can link the account by using the following transaction.
_72#allowAccountLinking_72_72import HybridCustody from 0x294e44e1ec6993c6_72_72import CapabilityFactory from 0x294e44e1ec6993c6_72import CapabilityDelegator from 0x294e44e1ec6993c6_72import CapabilityFilter from 0x294e44e1ec6993c6_72_72import MetadataViews from 0x631e88ae7f1d7c20_72_72transaction(parentFilterAddress: Address?, childAccountFactoryAddress: Address, childAccountFilterAddress: Address) {_72 prepare(childAcct: AuthAccount, parentAcct: AuthAccount) {_72 // --------------------- Begin setup of child account ---------------------_72 var acctCap = childAcct.getCapability<&AuthAccount>(HybridCustody.LinkedAccountPrivatePath)_72 if !acctCap.check() {_72 acctCap = childAcct.linkAccount(HybridCustody.LinkedAccountPrivatePath)!_72 }_72_72 if childAcct.borrow<&HybridCustody.OwnedAccount>(from: HybridCustody.OwnedAccountStoragePath) == nil {_72 let ownedAccount <- HybridCustody.createOwnedAccount(acct: acctCap)_72 childAcct.save(<-ownedAccount, to: HybridCustody.OwnedAccountStoragePath)_72 }_72_72 // check that paths are all configured properly_72 childAcct.unlink(HybridCustody.OwnedAccountPrivatePath)_72 childAcct.link<&HybridCustody.OwnedAccount{HybridCustody.BorrowableAccount, HybridCustody.OwnedAccountPublic, MetadataViews.Resolver}>(HybridCustody.OwnedAccountPrivatePath, target: HybridCustody.OwnedAccountStoragePath)_72_72 childAcct.unlink(HybridCustody.OwnedAccountPublicPath)_72 childAcct.link<&HybridCustody.OwnedAccount{HybridCustody.OwnedAccountPublic, MetadataViews.Resolver}>(HybridCustody.OwnedAccountPublicPath, target: HybridCustody.OwnedAccountStoragePath)_72 // --------------------- End setup of child account ---------------------_72_72 // --------------------- Begin setup of parent account ---------------------_72 var filter: Capability<&{CapabilityFilter.Filter}>? = nil_72 if parentFilterAddress != nil {_72 filter = getAccount(parentFilterAddress!).getCapability<&{CapabilityFilter.Filter}>(CapabilityFilter.PublicPath)_72 }_72_72 if parentAcct.borrow<&HybridCustody.Manager>(from: HybridCustody.ManagerStoragePath) == nil {_72 let m <- HybridCustody.createManager(filter: filter)_72 parentAcct.save(<- m, to: HybridCustody.ManagerStoragePath)_72 }_72_72 parentAcct.unlink(HybridCustody.ManagerPublicPath)_72 parentAcct.unlink(HybridCustody.ManagerPrivatePath)_72_72 parentAcct.link<&HybridCustody.Manager{HybridCustody.ManagerPrivate, HybridCustody.ManagerPublic}>(HybridCustody.OwnedAccountPrivatePath, target: HybridCustody.ManagerStoragePath)_72 parentAcct.link<&HybridCustody.Manager{HybridCustody.ManagerPublic}>(HybridCustody.ManagerPublicPath, target: HybridCustody.ManagerStoragePath)_72 // --------------------- End setup of parent account ---------------------_72_72 // Publish account to parent_72 let owned = childAcct.borrow<&HybridCustody.OwnedAccount>(from: HybridCustody.OwnedAccountStoragePath)_72 ?? panic("owned account not found")_72_72 let factory = getAccount(childAccountFactoryAddress).getCapability<&CapabilityFactory.Manager{CapabilityFactory.Getter}>(CapabilityFactory.PublicPath)_72 assert(factory.check(), message: "factory address is not configured properly")_72_72 let filterForChild = getAccount(childAccountFilterAddress).getCapability<&{CapabilityFilter.Filter}>(CapabilityFilter.PublicPath)_72 assert(filterForChild.check(), message: "capability filter is not configured properly")_72_72 owned.publishToParent(parentAddress: parentAcct.address, factory: factory, filter: filterForChild)_72_72 // claim the account on the parent_72 let inboxName = HybridCustody.getChildAccountIdentifier(parentAcct.address)_72 let cap = parentAcct.inbox.claim<&HybridCustody.ChildAccount{HybridCustody.AccountPrivate, HybridCustody.AccountPublic, MetadataViews.Resolver}>(inboxName, provider: childAcct.address)_72 ?? panic("child account cap not found")_72_72 let manager = parentAcct.borrow<&HybridCustody.Manager>(from: HybridCustody.ManagerStoragePath)_72 ?? panic("manager no found")_72_72 manager.addAccount(cap: cap)_72 }_72}
For the sake of this example, well use some pre defined factory and filter implementations. You can find them on the repo but on testnet we can use 0x1055970ee34ef4dc and 0xe2664be06bb0fe62 for the factory and filter address respectively. 0x1055970ee34ef4dc provides NFT capabilities and 0xe2664be06bb0fe62 which is the AllowAllFilter. These generalized implementations likely cover most use cases, but you'll want to weigh the decision to use them according to your risk tolerance and specific scenario
Now, for viewing all parent accounts linked to a child account and removing a linked account, you can follow similar patterns, using Cadence scripts and transactions as required.
_12import HybridCustody from 0x294e44e1ec6993c6_12_12pub fun main(child: Address): [Address] {_12 let acct = getAuthAccount(child)_12 let o = acct.borrow<&HybridCustody.OwnedAccount>(from: HybridCustody.OwnedAccountStoragePath)_12_12 if o == nil {_12 return []_12 }_12_12 return o!.getParentStatuses().keys_12}
and finally to remove a linked account you can run the following cadence transaction
_24await fcl.send([_24 fcl.transaction`_24 import HybridCustody from 0x294e44e1ec6993c6_24 _24 transaction(parent: Address) {_24 prepare(acct: AuthAccount) {_24 let owned = acct.borrow<&HybridCustody.OwnedAccount>(from: HybridCustody.OwnedAccountStoragePath)_24 ?? panic("owned not found")_24 _24 owned.removeParent(parent: parent)_24 _24 let manager = getAccount(parent).getCapability<&HybridCustody.Manager{HybridCustody.ManagerPublic}>(HybridCustody.ManagerPublicPath)_24 .borrow() ?? panic("manager not found")_24 let children = manager.getChildAddresses()_24 assert(!children.contains(acct.address), message: "removed child is still in manager resource")_24 }_24 }_24 `,_24 fcl.args([fcl.arg(account, t.Address)]),_24 fcl.proposer(AUTHORIZATION_FUNCTION),_24 fcl.authorizations([AUTHORIZATION_FUNCTION]),_24 fcl.payer(AUTHORIZATION_FUNCTION),_24 fcl.limit(9999),_24]);
Video Guide
Sample Flow PWA: Balloon Inflation Game
Game Overview
This PWA game revolves around inflating a virtual balloon, with a twist! The players engage with the balloon, witnessing its growth and color transformation, all while being cautious not to pop it. The ultimate goal is to mint the balloon's state as an NFT to commemorate their achievement.
You can view the game here. Visit this on your mobile device(for iOS use Safari).
The full code for this game can be found here: https://github.com/onflow/inflation

Key Game Features:
- Balloon Inflation:
- As the player inflates the balloon, it expands and changes color.
- A hidden inflation threshold is set; surpassing this limit will result in the balloon bursting.
- NFT Minting:
- Satisfied with their balloon's size, players have the option to mint it into an NFT, creating a permanent token of their accomplishment.
- Balloon Collection:
- Post-minting, players can view and showcase their collection of balloon NFTs.
- Account Linking and Custody:
- Players initially interact with the game in a walletless fashion via Magic.
- When ready to claim full ownership of their balloon NFTs, they can link their Magic account to a non-custodial FCL wallet of their choice.
Integration with Flow and Magic
The entire game is crafted upon the previously discussed setup, ensuring a seamless and user-friendly experience.
Playing the Game:
- Walletless Interaction: Users can jump right into the game, inflating the balloon and enjoying the gameplay without any blockchain wallet setup.
- Inflation and Visuals: The balloon's size and color change in real-time, providing instant visual feedback to the player.
Minting and Viewing NFTs:
- Magic Login for Minting: To mint their balloon as an NFT, players log in using Magic, embracing a walletless experience.
- Viewing NFT Collection: Post-minting, players can easily access and view their collection of balloon NFTs.
Taking Custody with Account Linking:
- Secure Custody: Players wishing to secure their balloon NFTs can utilize Account Linking to connect their Magic account to their personal non-custodial FCL wallet.
- Full Ownership: This step ensures that players have complete control and custody over their digital assets.
Conclusion
The balloon inflation game stands as a testament to the seamless integration of Flow, Magic, and PWA technology, creating a user-friendly blockchain game that is accessible, engaging, and secure. Players can enjoy the game, mint NFTs, and take full ownership of their digital assets with ease and convenience.


